
I may be slow at times, but I haven’t yet sunk to the mental aptitude of what we here in South Carolina call “pluff mud.”.

Crimson Trace Rail Master Tactical Light
You see, it recently dawned on me why Crimson Trace named its new product line “Rail Master.”
They could have gone with “Rail Light” or maybe “Rail Flashlight Thing” or perhaps “Rail-ey Tactical.”
But they didn’t. I think it was because the Rail Master was intended to represent a family of products from the get go. Back in February of this year, Crimson Trace launched the Rail Master Universal Laser Sight. Now they have applied the same idea to a tactical light. Add a green laser version and an infrared laser version, and Rail Master becomes a family of products. A series of related products that become “master of the rail” with their respective functions.
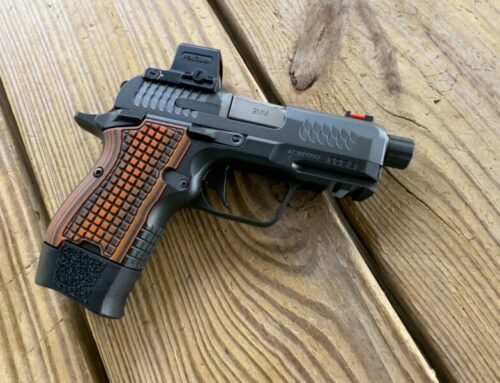
We’ve had a new Crimson Trace Rail Master CMR-202 for testing and evaluation the past few weeks. So far, I’ve worked with it on two different pistols – a Glock 32 Generation 3 and a Beretta PX4.
Highlights (How about that pun?)
The Crimson Rail Master Tactical Light is one tiny little thing. It weighs in at just 1.5875 ounces (with battery) according to my Frankford Arsenal handy dandy portable scale. Since this scale has a selectable units setting, you could also call that 694.5 grains, 225.05 carats, or maybe 45.01 grams. Just saying.

We also mounted the Crimson Trace Rail Master on a Beretta PX4
The Rail Master Tactical Light uses a single standard CR2 lithium battery – available at most any store starting with “Wal…” I’ve found that most drug stores and quite a few grocery stores carry this batter as well. With a full battery, the Rail Master Tactical Light gets just about 2 hours of continuous light. It’s got a five minute inactivity timer so it turns itself off in case you forget or it gets inadvertently turned on some other way.
The Rail Master is fully ambidextrous and is turned on with either of two paddle levers that will end up just in front of your trigger guard. I found that it was convenient to reach with either my trigger finger or weak hand thumb on the opposite side.
The Railmaster installs on most any pistol with a rail mount. It also can install on rail equipped rifles – just be sure that placement on a rifle allows for natural activation of the switch as the unit does not include a remote on/off option. Not yet anyway.
According to Crimson Trace, the CMR-202 Rail Master fits the following:
Fits pistols, rifles, and shotguns with M1913 Picatinny or Weaver Accessory Rail including: • 1911 Government or Commander with Rail • AR-15/M16 or similar rail-equipped long guns • Beretta PX4 Full Size and Compact, 92Vertec • GLOCK 3rd Gen 17, 19, 20, 21, 22, 23, 31, 32, 34, 35, 38 • GLOCK 4th Gen 17 and 19 • Heckler & Koch (HK) P30, 45, 45C • Ruger SR9, SR40, SR9c, SR40c • Sig Sauer P220, P226, P229 • Smith & Wesson M&P Full-Size and Compact • Smith & Wesson SD • Springfield Armory XD and XD(M) • Taurus Millennium Pro, 24/7 • Most other rail-equipped pistols with a minimum of 1 1/16″ from recoil lug.
Check out the light show…
The Crimson Trace Rail Master Tactical Light has three modes of operation. The basic idea is that you set the desired mode using a very deliberate step. Then, each time the paddle levers are activated, the light operates in the pre-selected mode. The Rail Master can be set with the following options:
Constant On: Either button turns the light on. It remains on until you tap one of the two buttons a second time. Or, after five minutes of inactivity, it turns itself off. The inactivity timer applies in all three modes.
Momentary Activation: You need to keep pressure applied to either one of the paddle levers for the light to remain on. Removing pressure from the switch turns the light off. This mode is good for quick on / off scenarios. Like hunting rats in the garage. Oh yeah, or being discreet while defending your home against sneaky ninjas.
Strobe Mode: Tapping one of the paddle levers will turn the light on with a rapid strobe effect. It remains on until the paddle is tapped again.
I like how you switch modes on the unit. Simply hold down both paddles at the same time for a few seconds. The light will now change modes. Release and it “sticks” in the selected mode. It’s not too easy to change modes – you have to be very deliberate about it. That’s a good thing as you don’t want the lamp turning on in an unexpected mode at the wrong time.
Installation
Installation was simple, but read the instructions first. The unit includes 4 different adapters to optimize the fit to specific guns. The following steps show installation on a Glock 32 Generation 3, but we also installed it on a Beretta PX4 with no trouble.
|
|
The Rail Master comes as three components: the body, the custom size insert (upper right in this photo) and the rail clamps. if yours comes assembled, loosen the two clamp screws and slide the clamps completely off the light body. |
|
|
The insert will now slide out of the body. |
|
|
Four inserts are included with the Rail Master to create a custom fit on your pistol. Refer to the enclosed chart to see which is designed for your pistol. Basically, the insert controls the distance that the light is mounted from the trigger guard. There are not necessarily hard and fast rules here. If you want the Rail Master to be be mounted more forward or back, feel free to experiment with some different inserts. |
|
|
For the Glock 32 shown here, the number 3 insert was the right fit. Slide it in from the left side as shown. |
|
|
Slide the rail clamps back on to the light body, making sure that the screws are still loose. |
|
|
Rock the assembly into place and check to make sure the light is positioned where you want it. Note how the insert fits into the rail slot on the gun to firmly position the Rail Master. |
|
|
The battery is accessible from the front. Simply remove the two screws next to the light lens and the battery cover slides off towards the front. |
|
|
Install the battery as shown. It won’t work flipped the other way around as we found out the hard way. It pays to follow the instructions carefully… Reinstall the cover and two front screws and you’re good to go! |


Does it hunt?
I did not have any home invasions during the evaluation period, so I was unable to test the unit in a genuine tactical emergency. So I resorted to the next best thing. Garage hunting.
Here in South Carolina, many houses located near swamps are raised. ‘Raised home’ is a fancy way to say that your house is built on top of your garage, so you have to climb steps to get anywhere. Realtors sell these homes by advertising the swamps as scenic wetlands. But let’s face it. A swamp’s a swamp. Anyway, raised houses have two benefits if you’re into rodent hunting. First, the semi-enclosed garage is humongous as it’s the size of the house floor plan. Second, being a semi-enclosed garage, located next to a swamp, you tend to get the occasional rodent visitor.
What better way to test a tactical pistol light than stick it on a pistol, load a few CCI Shot Shells, and go rat hunting?
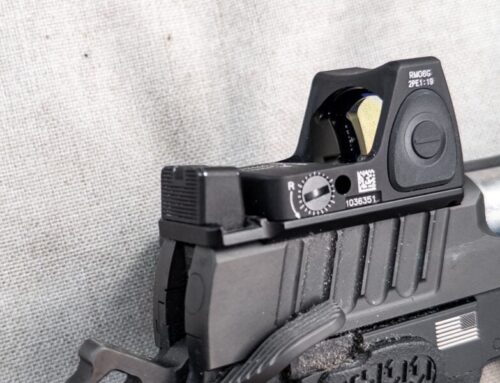
To get a better feel for the illumination pattern, we tried a few different options: The Crimson Trace Rail Master Tactical Light mounted on a Beretta PX4, the Crimson Trace Lightguard mounted on a Glock 31, and a Streamlight TLR 1 mounted on a Glock 17.
From the photos below, note the different beam patterns. The two units from Crimson Trace throw a fairly broad and even pattern which gently diffuses farther from the center. The Streamlight is a much more focused beam. Wandering around the swamp garage at night, I really preferred the broader pattern of the Crimson Trace units as peripheral view was much better.

Left to right: Rail Master, Lightguard, and Streamlight TLR-1. Not the slightly brighter 130 lumen beam of the Lightguard and the narrow beam of the TLR-1. Distance is 21 feet and columns are 8 feet apart.
Closing arguments
This is a nice little unit and especially handy for guns that don’t have a Crimson Trace Lightguard option. While I’m still experimenting, I think I like the Constant On mode best – hit one of the paddles and the light stays on until you turn it off. The small size and light weight is a real plus as well. I’m looking forward to testing this out on a rifle. Unfortunately, during this review period we did not have one handy equipped with a bottom or side rail.
Our Rating
 |
Four Nuns! Simple. Positive activation. Light. Great mounting flexibility. Useful light pattern. |


pluff mud, you must be in the low country my friend.
You must be able to smell it through my website 🙂 And yes, you are correct!
Could you give a shot of the SR9c with the CM-202? Thanks!
Sorry, don’t have an SR9c available…
I have it. See my email below if u want a pic.
One major flaw with cmr202. Can’t find a holster for it (sr40c ruger) PLEASE HELP ME!!!
Derek,
Have you found a holster to fit your SR40C with CMR202? I am having a hard time. If you found one, please email me. I’m looking for an IWB holster.
Thanks!
Check out Remora Holsters. I am not affiliated with them but I own one and it handles the light well!
Thanks for the tip Tim!
Thanks Tim!
Tim,
What model gun do you use the remora holster with the light. I have a SR40C and I’m having trouble finding a holster that will fit the light. Of coarse can’t find any ammo either.
Sr9c and I had the same issues. Go to the Remora website. Look at what they have. I believe for you, the 6 with the light adaptation should work. If you are unsure, call them. Great customer service
I ordered one thru Whitedog Holsters out of Washington State. Nice holster, similar to Crossbreed. He fit it perfectly for the CMR-202 on my SR9C
Funny you mention that. The folks at Crimson Trace just pointed me to White Dog. They’re making me an IWB for a 1911 with Lightguard.
I have the sr9c with the light mounted. If u want to see, email me at tbretthauer@yahoo.com
Thank for sharing Tim!
Very good article. I have one mounted on my Glock 36 .45ACP. Ariete LLC. makes a very nice rail for it.
[…] discounts apply on: Rail Masters®, Lightguards®, Defender Series®, Rail Master Pros®, Lasergrips® and Laserguards®. Further […]