
Depending on your equipment setup, there are a number of ways to re-prime cases
for reloading.
In case you haven’t been following our series on how to reload your own ammunition, we’re well on our way to reaching the end of the process. So far, we’ve covered the following:
Want To Reload Your Own Ammo? Basic Questions to Consider
Reloading: The Gear You Need And What It’ll Cost You
Reloading: Brass Cleaning and Preparation To Load
Reloading: Trimming Cartridge Cases
The next step in the process and one that must be completed before adding new power and seating a bullet is re-priming the cartridge case. It’s kind of important, mainly because if you don’t add a new primer before charging with powder, the powder will dribble out the bottom. Well, that and the cartridge won’t go bang.
Primers are small metal cups that can be pressed into the hollowed out primer pocket in the base of the cartridge case. On the inside of the primer cup is a magic compound that explodes when impacted with vigor and enthusiasm. The idea is that the firing pin whacks the bottom of a fresh primer, thereby blowing up that tiny bit of compound. The flame from this mini explosion travels through the primer flash hole into the main cartridge case body, thereby igniting the powder charge. As you might imagine, primers are a one-time use thing, so you have to insert a brand new one every time you reload a cartridge. Fortunately, they’re cheap, usually running about three cents each give or take.
In this week’s installment of the GunsAmerica Reloading Series, we’re going to take a look at the re-priming process and offer a look at the different ways you can do it.
Before we get started, I should reinforce the importance of using the exact components specified in your reloading manual recipe. While all primers of a given type, like Small Pistol, for example, may look the same, they’re not. Reloading manuals will almost always specify a primer brand for each load. Different makes of primers ignite with slightly different characteristics so Hulka Primer Company Small Pistol primers might generate different pressures than Cleetus’s Primer and Bait Company Small Pistol primers. Until you learn the nitty gritty technical stuff, follow the recipes exactly.
But Wait! Watch Out For Crimped Primer Pockets
If you’re reloading adopted or experienced brass cartridge cases, you will eventually run into a little gotcha – crimped primer pockets. Crimped pockets are commonly seen with popular military calibers like .223 / 5.56mm and 7.62x51mm / .308. Manufacturers will “mash in” the edges of the primer pocket towards the primer itself to secure the primer in place. The end result for you is that the opening of the primer pocket in the cartridge case will be a little smaller than you like, even after punching the used one out. The folks who originally made your cartridge cared more about primer security than your reloading convenience, so you can consider this little problem one of the costs of “free” brass picked up from the range. You might also see crimped primer pockets in lots of once-fired brass that you purchase.
Over time, you’ll learn which brass manufacturers crimp primer pockets, so that’s one way to spot these cases. You’ll also find out when trying to seat a new primer using any of the methods we’ll get to below. The primer won’t want to go in. If you feel a lot of resistance, don’t force it. Remember, primers are meant to explode when impacted and you really don’t want to start a chain reaction of little explosions on your reloading bench as that makes you look like a noob. Besides, it’s hard to explain to your family members.
If you do run into a crimped primer pocket, it’s no big deal to set things straight. There are a variety of tools that either cut or press those crimped edges out of the way, thereby restoring the primer pocket to a reloading-friendly size. We’ll cover primer pocket cutting, sizing, uniforming, and swaging in a separate article later in the series. If you don’t have knowledge or tools right now, just toss these cases into a bucket for use down the road.
Single-stage Reloading Press Priming
Since you have to have at least a single-stage reloading press to reload anything, it’s a handy thing that many (or even most) presses have a built in way to seat primers. It’s not a technically difficult operation after all. You’re just pushing a new primer into the pocket. It’s held in place by friction so all you need is a tool that provides a little bit of mechanical advantage.

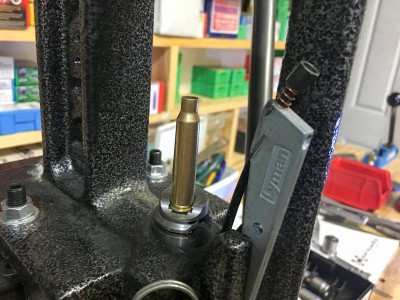
This Lyman Crusher II single-stage press
has a priming arm that places a fresh primer under the cartridge case on the down stroke.
Let’s consider Lyman’s Crusher II single-stage reloading press as an example. This model, like makes, has a priming arm hinged at the bottom. The top of the arm has a cup that holds a single primer. The ram of the reloading press has a slot into which the arm can swivel, thereby placing the primer directly under the cartridge case. As you lower the ram you push the priming arm into the groove in the ram and the case lowers onto the new primer. The mechanical advantage of the press provides the muscle to push the primer into the cartridge case. To make things a little more efficient, many presses allow attachment of a primer tube. Each time you move the priming arm back and forth, the arm picks up a fresh primer from the tube so it can be placed into the path of the descending cartridge case.
This method works and is basically free as you already have to buy a reloading press. When shopping for a single-stage press, it’s a feature worth considering if you’re trying to keep your startup costs to a bare minimum.
On the negative side, it’s kind of tedious. Or maybe I’m just utterly impatient. As a result, I never use this method anymore, but lots of folks swear by it, so don’t let my need for immediate priming gratification sway you away from this straightforward approach.


Leave A Comment