The next step in our Blackhawk! AR-15 customization project is to add a tactical light. Earlier in the series, we added a Blackhawk! Quad-Rail Two-Piece forend. This allows one to hang all sorts of important things on an AR-15. You never know when a rail-mounted accordion will come in handy, right?
We chose two Blackhawk! components for this step: the Blackhawk! Offset Flashlight Rail Mount and the Blackhawk! Night-Ops Legacy L-6V hand-held tactical light.
The Offset Flashlight Rail Mount is a 6061 T6 aluminum component, which is at least 4 better than 6057 T6 aluminum. It has a hard-coat anodized finish to blend in with your rail and minimize any additional glare. The mount will accommodate virtually tactical light with a 1 inch diameter tube. It’s offset design allows different mounting configurations. For example, you can mount the light high, over the rail, or low to use with a vertical foregrip as we’re going to do here.
We chose the Blackhawk! Night-Ops Legacy L-6V light for a couple of reasons. At its brightest setting, it almost outshines Wayne Newton’s teeth. Yes, it’s that bright – about 570 lumens. Other light modes include Medium, Low, Strobe and Off. We particularly liked the rotating dial selector for the different modes. Unlike some other tactical lights where weird end-cap gyrations determine the mode of operation, you set this one with the dial with a positive click and the tail cap activates the desired mode. It’s simple and you know what you’re going to get when you activate the tail cap switch.
The light uses two CR123 batteries. The three light modes, high, medium and low generate 570, 220 and 20 lumens respectively so you can tailor brightness and battery life to the job. The 570 lumen setting will run for about 2 hours while the lowest setting goes for over 33 hours.
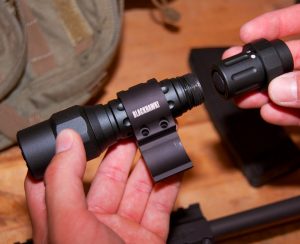 |
Since the tail cap of the light is larger than the one inch mount diameter, you need to remove the cap to insert the light. No worries, you have to do this to install the batteries anyway. |
 |
Note the large and positive mode-selection dial. Not shown is the momentary tail cap button on the back of the light. |
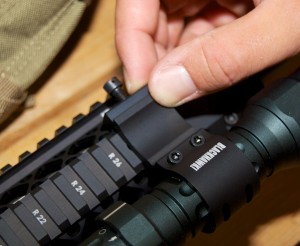 |
Mounting to a picatinny rail is a piece of cake. Just make sure the mounting bolt goes through a rail slot so the mount doesn’t slide backward or forward. |
 |
With this mount, the Blackhawk! logo is upside down, but we specifically wanted to try a low mount to use with the Blackhawk! Vertical Grip. If you elect the more common high mount on the other side, the logo will be upright! |

For this build, we chose to mount the light on the right side. This allows a standard grip using the Blackhawk! Thumb Shelf and the option to use the vertical grip with the thumb activated light.



light airsoft
Mounting a Blackhawk! Tactical Light on Your AR-15
MAC and PC Support
Mounting a Tactical Light on Your AR-15 | My Gun Culture
‘http://www.protow.com/Solutions/PrivatePropertyImpoundSoftware/tabid/199/Default.aspx’
Mounting a Tactical Light on Your AR-15 | My Gun Culture
cloud based private property impound software
Mounting a Tactical Light on Your AR-15 | My Gun Culture
prose
Mounting a Tactical Light on Your AR-15 | My Gun Culture