We’ve completed 3 steps out of the 5 planned for this Ruger 10/22 customization project. As my teenage kids would say, we’ve got “one sick rifle” at this point. As you’ll see from the photos, we’ve put a temporary optic on it for testing as the bull barrel has no iron sights.
What’s next?
Custom Ruger 10/22 Step 4: Install Volquartsen Extended Bolt Handle
How about an extended charging handle and recoil rod? Even with the temporary optic mounted, it’s ever so slightly inconvenient to reach the standard bolt handle. Since this is a benefit gun for Project Valour-IT, let’s make it awesome.
With some help from the guru’s at Brownells, we chose the Volquartsen Extended Bolt Handle and Recoil Rod. From Volquartsen’s specs:
The Extended Bolt Handle features the same shape and design as the bolt handle featured on our fully machined bolts. This handle has also been extended .25″ for faster, easier operation. The recoil rod is polished, hardened and coated with a proprietary finish. This finish is not only extremely hard but also contains lubricating features to create an extremely smooth operating guide rod. This coated recoil rod reduces friction which improves both feeding and ejecting. A recoil rod spring is also included. This spring has been cryogenically treated to withstand years of use.
Here are the steps to install the Volquartsen Extended Bolt Handle and Recoil Rod on our custom Ruger 10/22 rifle.
| If you’ve been reading along, you should remember how to do the first step – removing the barreled receiver from the stock. To refresh your memory, see the first article. As always, be sure the rifle is completely unloaded (chamber too!) before starting. Just remove the single screw that holds our new stock to the receiver and gently lift the barrel from the muzzle end first. | |
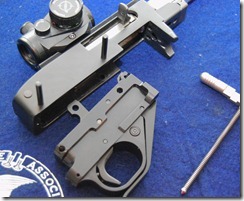
| To get to the bolt handle, we need to remove some stuff. First, we need to remove the trigger housing that we installed in the last step. To do this, push the retaining pins out, or at least far enough through the receiver to allow the trigger assembly to drop out. | |
| Now you will see the bolt in the upper portion of the receiver. While you’ll be able to move it back and forth, you won’t be able to remove it as there is a large solid pin at the very back of the receiver that prevents full travel. Gently punch this pin through and out of the receiver. | |
| Now, if you push the bolt all the way to the rear of the receiver, you’ll be able to remove it. It’s a tight fit and the bolt needs to drop out ‘as is’ without much angle, so it might be easier to turn the receiver upside down and let it fall into your hand. | |
| You can actually remove the existing bolt handle and recoil rod and spring by simply lifting up the front of the bolt. Go ahead and completely remove the bolt though. That will make installation of the replacement bolt handle much easier. | |
| Hey! Now that you have an empty receiver, this is a great time to scrub any gunk from those hard to reach places. | |
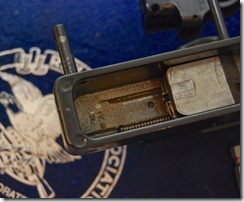
| The new bolt handle and recoil rod assembly drops into place as shown. Be sure the back end of the recoil rod is captured into the notch in the receiver. | |
| Now you’re ready to drop the bolt back in. Retract the new Volquartsen Extended Bolt Handle as the bolt has to drop onto notches in the bolt handle itself. | |
| Replace the large pin at the upper rear of the receiver first to make sure the bolt is secured. Then re-install the trigger housing assembly and secure it with the two retaining pins. | |
| Now just mount the barreled receiver back to the stock and you’re ready to go with a new Volquartsen Extended Bolt Handle. Piece of cake. |
That’s it! We’re done with Step 4 of the custom Ruger 10/22 project! No parts left over. No blood. All in all another successful endeavor.
Join us next time as we add the final piece of gear to this customized Ruger 10/22. We’re working with the great folks at Brownells to select just the right optic. If you have any ideas, let us know in the comments!
Remember to keep track of Soup it up for Soldiers here. As soon as this rifle is done, it’s getting shipped back to Ruger where it will be photographed and placed for auction on Gunbroker.com with all proceeds going to Project Valour-IT of Soldiers Angels.





Tom,
A short while back, my Mk II target pistol started stove piping or trapping a spent case in the action between the guide rod and the left wall of the action during cycling. I hadn’t torn the pistol or my 10/22 rifle apart since I purchased them well over twenty years ago for the now-incredible regular price of $139 for the rifle and $190 for the pistol…plus tax. I’ve always done simple, standard bore cleaning and would remove what gunk I could see in the action with solvent and swabs.
Both the Ruger10/22 and the Ruger Mk II pistol are most dependable (when clean) and highly-accurate rimfire examples available. I am not a trained or qualified armorer, but from working with ARs to patiently polishing sear engagement surfaces on some other rifles I own, I dove head first into the major cleaning project on both the rife and the pistol. I discovered that owner maintenance is simple with the rifle. It’s a little more complex with the Mk II pistol, but easily doable for anyone determined to learn more about the workings/function of their arms as well as first-rate care. All sorts of OEM and aftermarket parts are currently available from so many vendors or a local gunsmith. I think everyone should own at least one of each of these firearms! Tom’s “Soup It Up” offering like the one here, ensures novices the best return on their investment with the omnipresent Ruger 10/22.
For the worrisome or non-mechanically involved, your series makes it easy for the “average Joe’ to overhaul a Ruger 10/22. Your efforts are most commendable with the influx of new shooters joining the shooting sports world.
I did find a couple of “Oops” in the article w/accompanying pictures on installing a “Volquartsen Extended Bolt Handle and Recoil Rod”.
The bolt retaining pin was described as a “roll pin”‘; it is not…it’s solid. In the photo and omitted from text, the spring wasn’t placed a onto the new recoil rod nor written mention of it. There’s folks out there inexperienced enough to put it together as shown and then wonder why it won’t cycle. It was just a simple oversight I reckon.
Tom, please keep up your works to help others, but consider having another person review it for completeness (very thorough) brevity (which this one is…KUDOs for KISS) and accuracy (in the text descriptions herein, my point to you) and photos (yours are excellent).
To anyone who reads and views this article with my comments, you can become a “shade tree” gunsmith. Never attempt any work or modifications that may affect the SAFETY of a weapon unless you are willing to accept the consequences. You wouldn’t believe the gunk that literally copious rounds of shooting left behind in the actions and assemblies in both of my two weapons. For crying out loud…tear yours apart every 500 rounds. I would suggest that once you’re comfortable with doing a complete disassembly/reassembly, to think about offering a friend and fellow shooter a favor to “overhaul” theirs. Better yet, show them how to while you perform the work. This goes with an old USAF training maxim of “see one, do one, teach one”. They can always help with scrubbing and brushing out the trapped powder, lead, copper and lube residues in addition to the accumulation of other debris. I had to actually boil my Mk II in a strong soapy solution (al a muzzleloader-style) to get out the age-hardened build-up, as well as to keep from scratching or gouging some of the working surfaces. One of the sonic cleaners would have been a blessing! Oh well…
Tom…thanks for your series on improving this small bore platform and with the tear down/reassembly steps!
Happy and safe shooting, one and all,
Jon D Weatherspoon USAF Ret.
Thanks for the kind words Jon and for catching my ‘ooops!’
The faux ‘roll’ pin is in fact a solid pin (correcting in the article in a sec) and I apparently just had roll pin on the brain. Which is a weird thing to have on my brain…
The Volquartsen bolt handle and recoil rod we used actually has a captive spring included, so that was good to go in this particular case. We took it to the range for a test fire yesterday and it sure is nice to have the extra grip surface on the bolt handle. And it looks pretty cool, which is always fun!
You bring up some great points about the importance of cleaning on a somewhat regular basis. I’m always amazed at the ‘crud’ that gets into nooks and crannies 🙂
This is very informative and useful. I will be sharing this blog to other gun enthusiasts since I own a gun store in Georgia
Thank you very much again for sharing! More power to you!