Well, mostly this is an article about how to install an AR-15 flat-top front sight base and gas block. But we will share a few tips about how not to, learned the hard way, to save you aggravation should you choose to get adventurous with your own AR-15 rifle.
Here’s a pretty basic AR-15 rifle. This one happens to be a DPMS Lite 16 A3 AR-15. As you can see, it has the standard front sight base and gas block installed. While this piece looks to be permanently affixed to the rifle, it’s not. It’s just stuck on there, albeit really tightly, with a couple of pins.

Here’s a DPMS Lite 16 A3 AR-15. We’re going to replace the integral front sight base / gas block with a flat top version. So we can do a bunch of cool customizations to this rifle.
There’s nothing wrong with keeping the standard AR-15 front sight base, especially if you use no or low-power optics on your rifle. With a very low-power scope or red dot sight, you won’t really see the front sight (too much) and it makes a nice backup should your optic fail.
However, there are a number of good reasons you may want to consider removing the standard AR-15 sight block and replacing it with a flat top gas block.
Top 5 reasons to remove that ungainly AR-15 fixed front sight:
- While charging enemy positions, the wind resistance of the fixed AR-15 front sight slows you down.
- While it appears to double as a handy, integral bottle opener, you’ve come to your senses and determined that’s a really bad idea.
- Hardly any of Stickman’s rifles have one.
- You can use those . , the company who just told Colorado politicians to enthusiastically pound sand, makes them. Support the resistance!
- If you use a scope, you can still kind of see the front sight getting in the way. It get’s really annoying with a higher-powered optic.
Whatever your reason, you can do this from the comfort of your home!
The JP Enterprise Adjustable Gas System
We have a number of reasons for embarking on this Dremel-free (hopefully) home-gunsmithing journey. You see, this rifle is going to be the starting point for a project we’re doing with the folks at Blackhawk!. As we wrote about earlier, Blackhawk! is making some really swell accessories for AR-15 style rifles, and putting a flat top gas block will give us a little more flexibility. Stay tuned!
After consulting the folks at Brownells.com, we decided to install the . We like the way it mounts with 3 solid hex screws and that it offers a quick-detach rail at standard height. This will allow us to mount a Blackhawk! backup sight system later. We also like the adjustable gas flow feature which allows you to tweak the amount of gas flowing back to the action. Adjust it so enough gas flows to ensure reliable operation with your favorite .223 or 5.56mm ammunition, but not so much that your rifle gets battered to bits over time.
Ready for some basic gunsmithing? Let’s go!
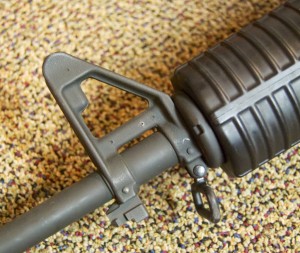 |
Here’s our existing front sight base and gas block. It kinda looks permanent, but only because some parkerizing goop has been sloshed over the seams. It’ll come off with a little love and tenderness! |
 |
First, remove the upper receiver from the lower. This will make things a lot easier. |
 |
In order to remove the front sight base, you’ll need to remove the flash hider or muzzle brake on your rifle. This will be much easier if you have a vise. Since we don’t have a dedicated barrel vise, we’re doing some budget improvisation and using an old kevlar vest as padding between our AR-15 barrel and those toothy vise jaws. What? It works… |
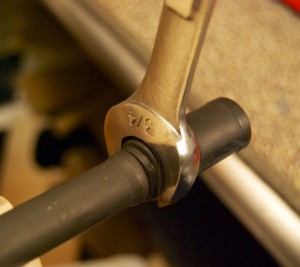 |
On our DPMS rifle, the flash hider was plenty tight, but not ridiculously so. A proper fitting wrench, a little elbow grease and some caution allowed us to take it right off. |
 |
Be sure not to lose the washer. And pay attention to its orientation as this will go back on after the new gas block is installed. |
 |
Now the threaded end of your barrel is exposed. What a great time to brush the crud off! |
 |
The next step is to punch out the two lower pins that hold the sight base to the barrel. This picture shows our highly-sophisticated system for supporting the barrel and sight base while allowing the pins to get knocked out the bottom. |
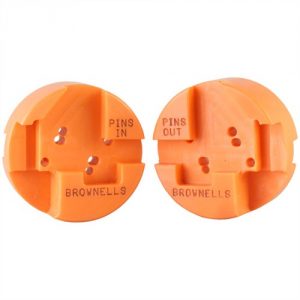 |
Better yet, get this . It’s specifically designed to support the front sight and has cutout holes for pin removal. You’re far less likely to ding up your rifle trying to pound out stubborn pins. It’s well worth the money, especially if you’re going to use it more than once. We got impatient waiting for ours and used the budget method, with the expected results… |
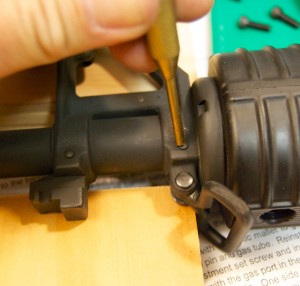 |
If you have , use them. You’ll be far less likely to ding up your existing sight base and your barrel. While brass leaves marks, it can be scrubbed off. Also, use a punch pin that is as close as possible to the diameter of the pin, without being larger. Using too small of a pin will “mush out” the pin and make it harder to remove. These pins are going to be pretty tight, so you’ll have to support the barrel well and smack the crud out of it. One of ours was so stubborn, we had to drill it out. Hopefully you won’t have to resort to that! |
 |
Now remove the upper pin that holds the gas tube in place. This one will come out pretty easily. Be careful not to bend the gas tube. Try not to notice the brass marks where we fought that second pin with very little elegance. |
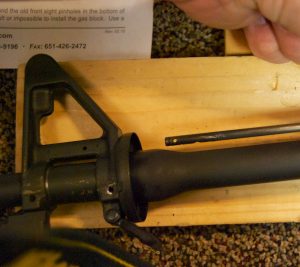 |
Now the gas tube will pull out of the front sight base. And you have yet another great spring cleaning opportunity. Clean the interior and holes of the gas tube, but remember to leave it bone dry when finished. |
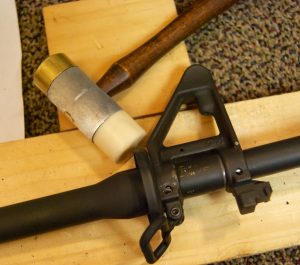 |
Here’s another one of those right tool for the job opportunities. You’ll need to whack the front sight base towards the muzzle a couple of times to break it loose. A will do the job. |
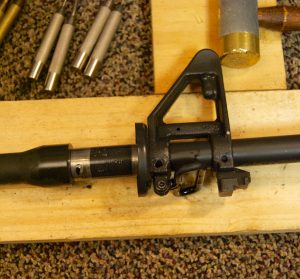 |
Once broken loose, the front sight assembly will slide forward and off the barrel. Here’s where you’ll get to see how much attention to detail was placed on your rifle’s manufacture. This barrel was not parkerized under the sight as you can see the bare steel. |
 |
Yet another cleaning opportunity. If your rifle has been used, there will be some gas crud around the gas port. Clean it off and dry. |
|
Now we’re cookin’ with propane! Insert the gas regulator screw into the gas block just enough to hold it in place. Next, insert the gas tube, making sure to insert the right end. |
|
Be sure that the hole in the gas tube aligns properly with the gas block port before the next step. |
|
Slide the whole assembly into place, being careful not to bend the gas tube. |
 |
You’ll see the holes where the gas tube enters the receiver. Line everything up. |
|
Once you’re confident that everything is in place, you can insert and tight the three hex screws that hold the gas block to the barrel. Now you can reinstall your flash hider or muzzle brake. |
|
That’s it for the installation portion of this upgrade. Just replace your hand guards and reattach the upper and lower receivers. The next step has to be done at the range, so be sure to read on! |
|
|
Adjusting the JP Enterprise Gas Block
Earlier we mentioned that you can tweak the gas flow using this particular JP Enterprises gas block. The process is a lot easier than it sounds.
- Bring your normal .223 and/or 5.56mm ammo to the range.
- Be SURE to bring the included hex wrench that fits the gas adjustment screw!
- Turn the gas adjustment screw (the silver one) all the way in to completely close off the gas port.
- Now back it out a couple of turns.
- Load and fire one shot.
- If the bolt of your rifle stays open, you’re likely done. If it does not, then you’re not getting enough gas. That sounds kind of wrong doesn’t it?
- If your bolt is not locking open on the last shot, keep opening the gas screw until the bolt locks back consistently on the last shot.
- When you get it set, you may want to use a little LocTite to keep it from moving around. Be sure to use low or medium strength so you can break the screw loose later if you need to!
- Just remember, if you change ammunition, you may need to readjust.
Next up, the Blackhawk! AR-15 upgrade project. Each article, we’ll document one part of the upgrade process.
Stay tuned!
You can find this at Brownells
J P Enterprises Ar-15/M16 Adjustable Gas Block
Loading…





I would remove the gas tube pin before the sight pins, but it worked out ok-
And just a tip- The Magpul sights WILL melt if attached to a gas block- you need a metal sight.
Thanks for sharing the tips! And yes, we’re putting the Blackhawk! metal sights on this rifle for just that reason. I should have clarified that in the article 🙂
[…] idea led to another and soon we decided to build a Blackhawk! custom AR-15. As I wrote about a few days ago, I’ve got a stock DPMS Lite 16 A3 AR-15 that is just screaming for a little […]
How do you ensure the hole in the gas block is aligned with the gas hole in the barrel? Obviously if the bolt locks to the rear it is aligned. Is there a needle that can align them or am I just one of the slow guys?
It’s kind of self-aligning as the hole in the gas block is oversize, so it lines up pretty well on its own. There was no need to use a line to carefully line of the barrel hole and gas block hole – I should have clarified that in the article. Since the gas tube is bent, that was also easy to orient correctly – it would have been hard for the hold in the gas tube not to be lined up with the gas block. Does that help clarify?
Proper placement really is a breeze.
#1 Block the barrel at the barrel extension.
#2 Use an air compressor with air blower attachment blow down end of barrel
#3 Till as you are adjusting gas block with the gas tube in it, the most amount of air is coming thru the gas tube out of the receiver towards the bolt carrier.
#4 Tighten your nuts you are good to go.
Does anyone know if you’re allowed to say “tighten your nuts” on the internet?
Just kidding… Thanks for the tip!
Possible reason why you had to drill out one of your gas block pins: most pinned gas blocks use two opposing taper pins. If you tried to drive both pins out in the same direction, one would be essentially impossible.
Although I’ve heard that not all are like this, so now I’m not sure. The handful I’ve worked with were all set up like this, though, so it’s a possibility.
I’ve never seen opposing taper pins. Now. I’m not gonna say that’s not something some manufacturers may do. I’ve never personally seen it. I’ve always thought the pins (both) go in one side and come out the same. That’s why some AR bench blocks have front sight “in” on one side and “out” on the other. The sight has to be turned the correct way for the pins to come out. And if reinstalling you’ve got to be sure to put them back in the way they came out. Taper pins are a pain in the rear. That’s probably why so many manufacturers have pretty much stopped making rifles with an A2 front sight base. Much easier to just bolt on a flat top or low profile gas block.
[…] Tablespoon, you can easily replace the front sight base (FSB) with a gas block if that is more your style, then you can install flip-up sights or just use an optic if you want. Here is an article that explains it well. How (Not) to Install an AR-15 Flat Top Gas Block and Front Sight Base […]
Say, as long as you got the front sight off, it would be a great time to replace the barrel nut with one that allows you to mount a free floating handguard. Just sayin’
You guys should do barrel removal on a Ruger AR-556. Theur barrel nut does not come off easy at all…help!
I second this…. I broke my delta ring last night
This is great info site,I called Olypmic arms ,had new rifle with front site only,there tech was not a good solution be very careful if you buy their product,cust service is terrible.
Hi, I think you must have caught Olympic Arms on a bad day. I had an Olympic Arms rifle ( thought it was theirs, but only the lower was an Oly product). I bought it used, but took it in, found out the bolt carrier key was loose, the gas tube was bent, and the upper was so much of an off brand the gun techs couldn’t find a manufacturer. However, they fixed it up, and did it for under $10. Amazing.
Good article. Finally, someone who provides instructions on my level – lack of patience, know how and proper tools. Real men don’t need instructions – I only needed this article to make sure my methods were sound.
The author was correct; once I hammered and cursed my new block into place, I conducted timed charges at a silhouette cut-out target of my mother-in-law. With the aerodynamically more efficient low gas block installed, I was able to shave several nano-seconds off my times. This was done while wearing full body armor and carrying six extra magazines. Now I feel confident I can take her the next time she visits.
????????????
Nice!! Good one sir.
Larry Bates, Would like to thank youall for the information on replacing front sight on a Ruger 5.56 would have never tried it on my own . Turned out real nice . Had to drill 2 pins out ! Thanks again . Larry